|
Notes 1- 10
Note - 1
Vane-- The vane is made from any light and stiff material. I have
had good
results using fir plywood or white cedar. I also have used
fiberglass covered insulation foam. Others have used plastic panel
material. The 1/4 inch plywood one I show makes a rugged one and is light
enough.
The bolting arrangement gives a solid and stiff mount with for minimal weight.
Note - 2
Vane carrier-- The vane carrier is bent up from 1/4 by 1 inch aluminum bar stock
as is sold in hardware stores. I expect it is one of the
6000 series extruded material that is anodized for sales appeal. However , I
find very little corrosion on mine after several years exposure to salt air.
Stainless would be a better choice for sea going and would not need to be more
than 1/8 inch or 3mm for the same stiffness.
Note - 3
Vane support fitting-- This looks more complicated than it is. Start
with a 2
inch PVC tee fitting and locate the holes for the pivot shaft. Drill
them with a
small drill. About 1/8 inch and then use a longer 1/4 inch drill to
open the
holes and make sure they are aligned .
Make rough cuts on each side and install the vane carrier. Using the carrier as
a guide continue cutting to form the stops so the swing is limited to about 45 degrees.
Note - 4
The mast support tube --Is a length of 2 inch PVC pipe cut to be high
enough for
the vane to clear the deck and
any boom overhang. If need be on your boat it could be braced off to the stern
rail or deck with a collar fitting to allow rotation and still cut down on
vibration of a long pole.
Note - 5
Mast support assembly-- There are several unique features in this
assembly.
First, the base is fastened to the platform with screws installed so
that they
grip both the outer
fitting and the 3 inch pipe. The upper 3 inch cap is cut to a free
fit on the mast support pipe and a cut off bit of a 2 inch fitting is
used to support the mast at his point. The lower end of the mast support pipe is
fitted with a similar stop to prevent the mast from lifting. A rough sanding
belt or such is used to provide a grip to the course setting line . Notice that
this line does not make a complete 360 degree turn around the mast pipe.
Note - 6
Platform and hangers-- The platform is a simple piece of 3/4 plywood or
some substitute
you might have.
It can be any shape to fit your boat and several have been built using bent
steel or aluminum tubes. I like the idea of using ordinary copper plumbing
fittings and pipe. Using 3/4 type L pipe soldered with the new lead free solders gives a basis for a substantial
frame. Paint it with aluminum paint and it will look like
it was made of stainless and cost far less.
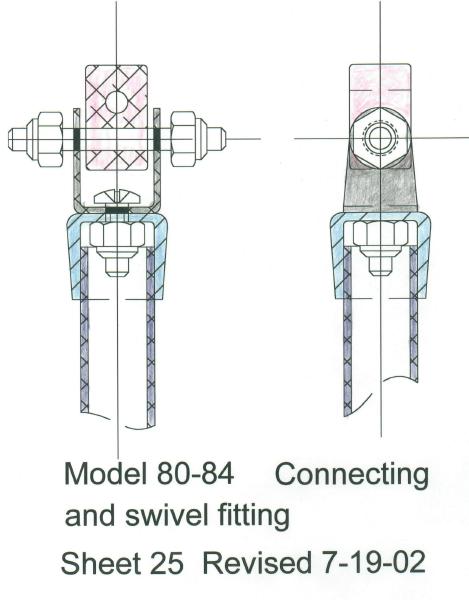
Note - 7
Push rod and fitting-- This is another item that is up to you for
choice. I show
a simple aluminum rod but almost any light stiff rod would do. Light
aluminum
tubes or a fiber glass fishing rod would be fine.
One end needs to have the ability
to
swivel for the course setting. CPVC pipe in 1/2 inch size
with caps as shown in sheet 25 on the
" Advanced " page.
| 